
National Hobby Month: A Guide to Hand Sewing
Lots of people are reluctant to take up sewing because they are worried about investing in a machine. No worries! You can still get going on your sewing journey by beginning with hand sewing.
National Hobby Month: A Guide to Hand Sewing
What can I make using hand sewing?
Hand sewing is a great way to get started with sewing, and build up your stitching skills slowly and confidently. Although it takes longer than using a machine, you can get your stitching looking exactly how you want it, where you want it! You can make all sorts of small projects - some of the most popular ones are pin cushions, small toys, felt projects and hanging decorations.
Basic hand sewing stitches
There are 3 basic hand sewing stitches: running stitch, back stitch and whip/blanket stitch.

Running stitch is one of the most commonly used stitches, which is the easiest and quickest to sew. It involves simply inserting your needle into your fabric front-to-back and then back through from back-to-front at a space of about 0.5cm.

Back stitch is a little more complicated but used for more decorative purposes than running stitch, often used in embroidery detailing. It involves bringing your needle through the fabric back-to-front and pushing it back through like running stitch front-to-back (steps 1-2). At this point you then begin a Step 1 again, at point 3, starting where you want the left hand side of the stitch to begin. Repeat Step 2 to anchor your stitch at point 4, where your first stitch began.
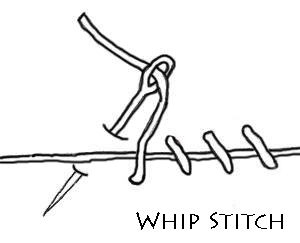
Whip stitch and blanket stitch are often terms used interchangeably, although there are two techniques for doing this.
Whip stitch is a little more simple, and is usually used on the edges of your material, to bind them together in a decorative way. It involves bringing your needle through the fabric front-to-back, but without bringing it back through back-to-front; instead, you simply pull you thread up and over the side of the fabric, and place a new stitch front-to-back to the left of the previous.

Blanket stitch is very similar and is used for much the same purpose, it just involves pulling your needle and thread through under the stitch you created previously as you begin the next one, to add a line of thread along the gap between the two edges of the fabric.
Starting and finishing your stitches
It's always important to start and finish your stitching properly, so all your hard work doesn't go to waste! Remember to knot your thread securely at one end before you begin - it sounds silly to remind you, but you'd be amazed how often you can forget or make a knot that is too small and gets pulled through mid-stitch. Always make sure your knot sits on the inside of your project for neatness.
When measuring out your thread, make sure you add plenty of extra - you don't want to get to the final few stitches and then realise you don't have enough left to knot it properly! Like at the beginning, securing your final stitch is super important so that your stitching doesn't come undone. I like to stitch through my last stitch a couple of times for extra security, then knot off.
What you'll need
Lucky for you, this is pretty simple - all you really need is a pack of good quality needles, some pins and a pair of scissors! You can then choose your material and thread according to your project. So easy to get started right away!
Projects
Great hand sewing projects to have a go at are pin cushions, felt projects and hanging hearts - all require simple cutting and can be as decorative as you like, leaving you plenty of time to practice getting your stitching right!

Why not try one our fabulously easy Strawberry Pin Cushion kits? It includes everything you need to complete the project, including a pattern, instructions, fabric, ribbon and thread - just grab your needle, scissors and pins, and off you go!
Or if animals are more your thing, we also have these very popular Felt Owl Kits, designed for beginners. They come in 4 different colours too, and you can hang them up around the house when you're done!

