
Sewing for Beginner's: Choosing and Setting Up a Sewing Machine
Always wanted to give sewing a go but didn't know where to start? We've compiled an easy place to give you all the information you need to get started in this creative hobby!
In this post we cover how to choose your first sewing machine....
Sewing for Beginner's: Choosing a Sewing Machine
You don't need a sewing machine to sew, but most people prefer to use a machine because it's a lot quicker and tends to be more even - especially when it comes to things like dressmaking with lots and lots of seams! Remember, for hundreds of years before the sewing machine was invented, everything was stitched by hand.
Choosing a sewing machine is a bit like choosing a car - they all essentially work the same, but the features and the way it 'drives' will vary a bit by manufacturer. Generally, any of the big brands offer good quality machines - Janome is our favourite but many people also like Brother, Singer, Husqvarna and Juki too.
Consider what features you may want to use and the budget you've got to spend, as well as how long you want the machine to last you in your sewing journey. If you're on a tight budget and just want to get started quicky, you can often pick up a basic Brother or Janome machine for under £100. These are great for starting out and have all the main stitches and features you'd use over time, but they aren't as swish and tend to omit those handy little extras that you may find help prevent a lot of frustration.
If you think you'll use your machine a lot and can afford to, we'd recommend getting the best machine you can afford that has all the features you want - this doesn't necessarily mean the most expensive! Usually the more expensive they are, the more extras they have, such as more decorative stitches, features like automatic bobbin winder, start/stop button, needle threader etc. They also include digital features as you progress up the price band, which may or may not be a good thing. They tend to be more slick and easier to use but the computer element is more likely the break than the more mechanical basic models without a digital element.
Think about what you'd find most useful - eg, a needle threader if your vision is less clear or you sew in the evenings as you may get frustrated trying to see to thread the needle constantly! Generally, I'd recommend getting something with a speed control, needle threader and automatic bobbin winder if you can as these tend to be really helpful features that I always regretted not having on hand with my first machine, and often the next machine up has these for not much more money.
Don't forget to check out people's reviews online, and if you can, go to a machine shop and see if you can try one out! Lots of them will let you have a go before you commit to buying.
Machine Basics
Once you've got your machine, you'll need to learn what the different parts are and how to set it up. You can find a basic anatomy of a machine (sometimes where things are may vary slightly by brand/model) in your manual that comes with the machine. I'd recommend taking the time to read your manual as often they do actually have a lot of info on how to use all features of your machine to the fullest, including the different feet!
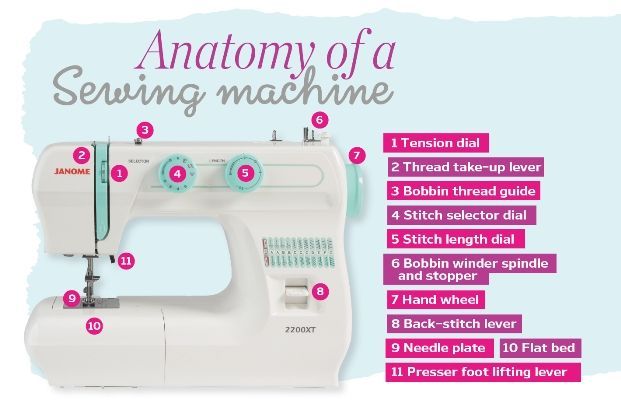
(Anatamony of sewing machine by Sew Magazine)
Ultimately, you'll need to learn how to wind a bobbin, thread your machine, adjust the tension and start/stop stitching as a basic requirement. Your manual will show you how to thread your specific machine, and often you'll find numbers and/or arrows printed on the machine too to show you where to place the thread. Make sure you put the spool cap on over the end of your thread, otherwise it will pop off as you sew, and follow the numbers. When you thread the thread through the metal 'eye', ensure the needle is in the highest position by using the turn wheel on the side of the machine.
You'll also need to wind some thread onto your bobbin, Make sure you've got bobbins suitable for your machine (normally they come with a few when you get it). There's a small metal spoke on the top of your machine that holds the bobbin for winding. You'll need to thread the machine differently to wind your bobbin - normally this goes round something on the top of the machine like a metal screw to help give tension, and then thread the end of the thread through from the middle of the bobbin to the outside, through the hole. Pull a couple of inches of thread through so you've got enough to hold on to, then pop the bobbin onto the metal spoke until you hear it click into place. You may need to set your machine to bobbin winding mode if it's digital, or slide the metal spoke to the side to engage this feature. Next, disengage the needle by pulling the turn wheel out away from the machine - don't worry, it's designed to do this! - which will stop the needle going up and down when you wind the bobbin. Hold the end of the thread firmly and then push the foot pedal or start/stop button to start your bobbin winding. Don't let go until it's wound a few rounds of thread onto the bobbin or it will unthread itself! Keep going until it looks full or stops on it's own (if you have this feature).
Once you've filled your bobbin, you need to thread this up into your machine too. There are two types of bobbins on a machine - front loading or drop-in style. The drop in is a little less fiddly, but both essentially work the same!
Here's how to thread a drop-in bobbin:
And here's how to thread a front loading bobbin:
Make sure you've drawn the bobbin thread up through the machine before you start stitching. To do this, hold the top thread taught and then raise and lower the needle. This should pull a loop of bobbin thread through from the bottom of the machine, you just need to pull it out and ensure you've got a good tail of thread (about 8cm is good) that's sitting out towards the back of the machine.
Now you're ready to start stitching!
Raise the presser foot - there should be a lever somewhere behind and to the right of the needle - then place your fabric underneath, lining up the edge of the fabric with the seam allowance you need on the metal plate underneath. When you've got it in the right place, lower the lever to lower the presser foot.
Put your foot down, and you're away!
